- 08 Aug 2025
- Print
- DarkLight
- PDF
B2B Appointments
- Updated on 08 Aug 2025
- Print
- DarkLight
- PDF
Overview
Appointment creation allows you to schedule the delivery of your shipments with your consignees, when they can only receive shipments during specific time slots when their inbound docks and staff are available.
Note: Appointments can be created only for shipment that are currently in Manifested or In-transit state.
In this section
- How to create an Appointment on Delhivery One?
- How to update an Appointment on Delhivery One?
- How to reschedule an expired Appointment on Delhivery One?
- How to bulk update Appointments on Delhivery One?
How to create an Appointment on Delhivery One?
Steps to create an Appointment:
- Navigation
- Login to your B2B account on Delhivery One
- Go to the Left Panel > B2B orders > Manifested or In-transit > Open the required LR
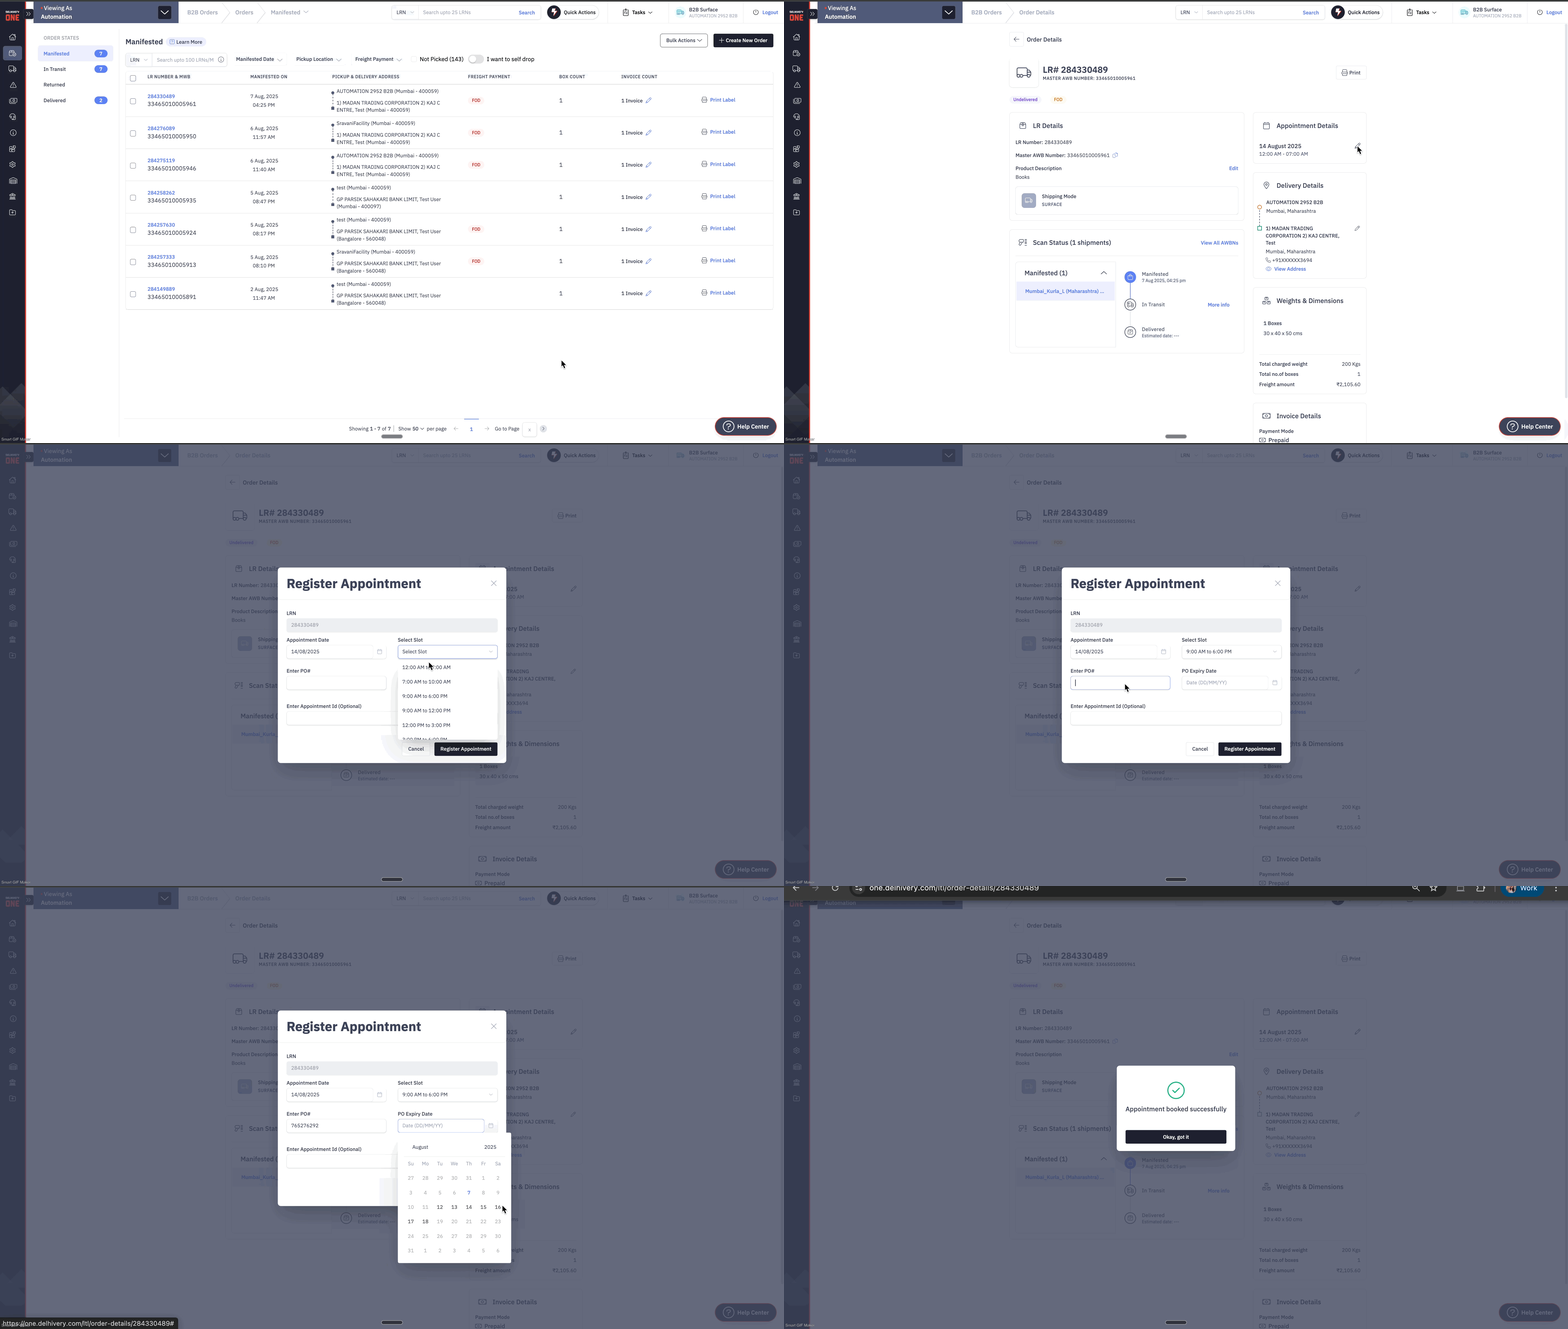
- Tap on Create New Appointment on the top right corner
- Appointment Date & Time
- Select the date and time slot during which you want our field executive to deliver your shipments to the consignee
- You can view and select the available time slots from drop-down
- Purchase Order(PO) details
- Enter the valid PO number and the PO expiry date.
- Incase of multiple PO numbers, you can enter up to 5 PO numbers, separated by commas
- PO expiry date should be greater than Appointment date
- You can enter the Appointment ID (optional)
- Tap on Register Appointment.
Once you create an appointment for a shipment, our field executive will attempt to deliver your order to the consignee on the specified appointment date & time.
How to update an Appointment on Delhivery One?
Steps to update an Appointment:
- Navigation
- Login to your B2B account on Delhivery One
- Go to Left Panel > B2B order > Manifested or In-transit > open the required LR
- You can see your existing Appointment Details on the right.
- Click on the Edit icon.
- Update Appointment Date & Time
- Update the date and time slot to when you want our field executive to deliver your shipments to the consignee.
- You can view and select the available time slots from drop-down.
- Purchase Order(PO) details
- Enter the valid PO number and the PO expiry date.
- Incase of multiple PO numbers, you can enter up to 5 PO numbers, separated by commas.
- PO expiry date should be greater than Appointment date.
- You can enter the Appointment ID (optional).
- Tap on Register Appointment.
How to reschedule an expired Appointment on Delhivery One?
You can create a new appointment if the existing appointment of any of your shipments has expired.
Steps to reschedule an expired Appointment:
- Navigation
- Login to your B2B account on Delhivery One.
- Navigate to the Left Panel > B2B orders > Manifested or In-transit > open the required LR.
- Under Appointment details, you will see a message if your previous appointment has expired.
- Click on Create New Appointment.
- Appointment Date & Time
- Select the date and time slot during which you want our field executive to deliver your shipments to the consignee.
- You can view and select the available time slots from drop-down.
- Purchase Order(PO) details
- Enter the valid PO number and the PO expiry date.
- Incase of multiple PO numbers, you can enter up to 5 PO numbers, separated by commas.
- PO expiry date should be greater than Appointment date.
- You can enter the Appointment ID (optional).
- Tap on Register Appointment.
How to bulk update Appointments on Delhivery One?
If you need to book appointments formultiple shipments, you can save time by using the bulk upload feature.
Steps to Update Appointments in Bulk:
- Navigation
- Login to your B2B account on Delhivery One.
- Go to Left Panel > Exceptions & NDR > Appointment Needed.
- Click on Bulk Appointment Booking on the top-right corner
- Download the sample template
- Under the instructions, click on 'Download Template'
- Open the template and fill in the required information for each shipment.
- The first row contains sample data for reference; be sure to delete this sample before saving your file.
- For more details on each field, refer to the glossary.
- Once all the fields are updated, save and upload the file.
- Once the file is uploaded without any errors, your appointments will beupdated successfully
- Error Handling
- After uploading, if file contains any errors , you will have the option to view and download an error report
- Click on Download Report. This downloads a zip file containing 2 separate files:
- Error file : Lists all LR numbers where appointment booking failed, along with error remarks.
- Success file : Lists all LR numberswhere appointment booking was successful.
- Review the error file, resolve the errors and re-upload the file for failed LR numbers
- Once the file is uploaded without any errors, the appointments will be successfully updated
.gif)


.gif)
